Schematics of the pATLAS database creation
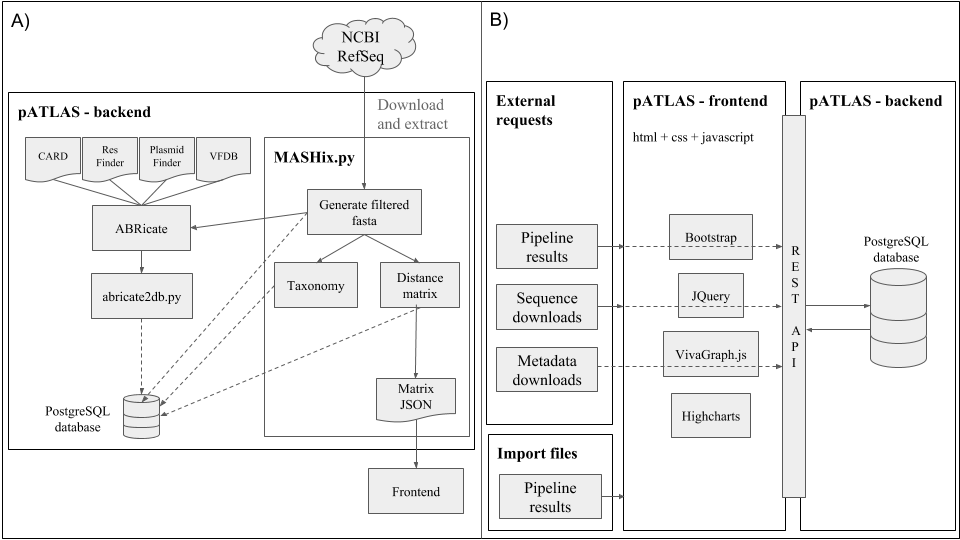
Workflow for database creation
1) Download plasmid sequences available in NCBI refseq.
2) Extract fasta from tar.gz.
3) Download and extract NCBI taxonomy, which will be fed to pATLAS.
4) Clone this repository:
git clone https://github.com/tiagofilipe12/pATLAS
5) Install its dependencies
6) Configure the database:
createdb <database_name>
pATLAS/patlas/db_manager/db_create.py <database_name>
7) run MASHix.py - the output will include a filtered.
fasta file (master_fasta_*.fas).
8) run ABRicate, with CARD, ResFinder, PlasmidFinder, VFDB databases.
# e.g.
abricate --db card <master_fasta*.fas> > abr_card.tsv
abricate --db resfinder <master_fasta*.fas> > abr_resfinder.tsv
abricate --db vfdb <master_fasta*.fas> > abr_vfdb.tsv
abricate --db plasmidfinder <master_fasta*.fas> > abr_plasmidfinder.tsv
9) Download the card index necessary for the abricate2db.py script (aro_index.csv).
10) Update the git submodules (git submodule update --init --recursive) and run abricate2db.py - using all the previous tsv as
input.
# e.g.
abricate2db.py -i abr_plasmidfinder.tsv -db plasmidfinder \
    -id 80 -cov 90 -csv aro_index.csv -db_psql <database_name>
11) dump database to a sql file.
Automation of this steps
This steps are fully automated in the nextflow pipeline pATLAS-db-creation.
Creating a custom version of pATLAS
If you require to add your own plasmids to pATLAS database
without asking to add them to pATLAS website,
you can provide custom fasta files when building the database using
the -i option of MASHix.py.
Then follow the steps described above.